When Smart Home devices first started becoming mainstream, players like Philips and LiFX released their range of smart light globes and really showed what was possible when it came to automating lights.
As time went on and their popularity grew, something became very obvious to retrofitters and those with LED downlights.
In order to automate the lighting in your home, you would have to replace every single light bulb with a smart globe and then each globe is controlled separately. Imagine having a kitchen or dining room with more than 4 lights! Needless to say, it became a little complicated. Good news is that Z-Wave has had an answer for Smart Lighting Automation for many years and you can keep the lights you currently have in your home!
Generally speaking, there are three main ways that lights can be influenced and they are switching them on and off, dimming their luminosity and changing their colours. Below we will dive into a few examples of these methods of control and automation, and share a few genius hacks along the way! Something important to remember is that lighting automation and wiring needs to be completed by a Registered and Insured Electrician. We recommend you contact one here.
Let’s begin with the basics of switching lights on and off.

Switching Lights On and Off
What will you need:
- A Z-Wave Lighting Module such as the Qubino 1 Relay or Qubino 2 Relays
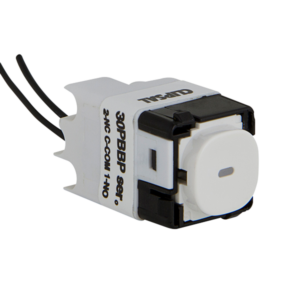
- Mechanical Pushbutton Light Switch such as the Clipsal 30PBBP or 60PBBP
- Lighting circuit with Neutral preferably at the wall
- A Z-Wave Gateway such as the Vera Plus
How to get this in your Home:
- When you install smart lighting in your home it allows for control and automation from both the buttons on the wall, and via a tablet, mobile device or computer through your Z-Wave Gateway. In order to obtain best results we recommend first changing the switches on your wall to a Mechanical Pushbutton. If you choose to leave your standard toggle switches on the wall, please ensure that your Z-Wave lighting module is set up to work with toggle switches. This can be checked by reading the user manual and checking the parameters/configurations as they may be set to one type of switch from the factory.
- Locating the Neutral wire is important as this will dictate where your Z-Wave lighting module will be installed. Some houses have the Neutral wire located behind each and every wall switch plate, while others might have them located in the ceiling cavity. Your electrician will be able to locate them and will be able to then install the Z-Wave lighting module correctly.
- Figure out what type of circuit you have. The great news is that regardless of whether you have two way or three way switching you only need one Z-Wave lighting module per circuit! This makes life much easier when it comes to keeping your home as familiar to you before you made your lights smart. Just remember to change the buttons to mechanical pushbuttons!
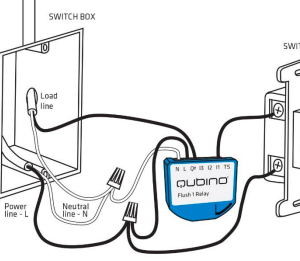
- Wire up your Z-Wave lighting module as instructed in the user manual. The Qubino range of lighting modules comes with wiring diagrams in the user manual, as do most other brands. However if this is too small to read or you have misplaced it, here is one we prepared earlier!
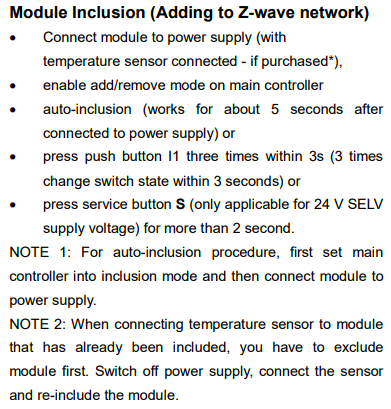
- Include your Z-Wave lighting module into your Z-Wave Gateway. This should be the easiest part of the entire process so long as you pay attention to how the Z-Wave lighting module is placed into inclusion mode. All devices have slightly different methods of setting them into inclusion mode, so once again please refer to the user manual included with the device. Here is the method used by Qubino.
- Automate your lights! Once your Z-Wave module has been successfully installed and included into your Z-Wave network, you can control it from the wall or your devices and you can create automation pathways called scenes. Scenes will allow you to have your lights switch on and off at certain times of day, when a motion sensor detects motion, or even when lighting levels drop below a certain level. We will go into some automation options at the end of this article.
Dimming your lights
What will you need:
- A Z-Wave Dimming Module such as the Qubino Dimmer
- Mechanical Pushbutton Light Switch such as the Clipsal 30PBBP or 60PBBP
- Lighting circuit with Neutral preferably at the wall
- A Z-Wave Gateway such as the Vera Plus
How to get this in your Home:
- Just like before, dimming can be achieved via a number of ways. Step one remains the same however. In order to obtain best results we recommend first changing the switches on your wall to a Mechanical Pushbutton. They are easier to wire up to the Z-Wave lighting module and remove the risk of confusing your gateway as to the state of your lights.
- Locating the Neutral wire is important as this will dictate where your Z-Wave Dimming module will be installed. Some houses have the Neutral wire located behind each and every wall switch plate, while others might have them located in the ceiling cavity. Your electrician will be able to locate them and will be able to then install the Z-Wave Dimming module correctly.
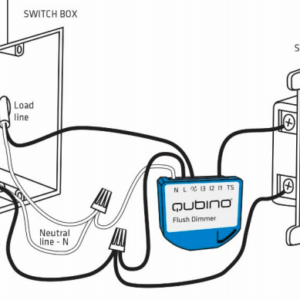
- Wire up your Z-Wave Dimming module as instructed in the user manual. Once again, the Qubino Dimmer comes with wiring diagrams in the user manual, as do most other brands. Once again, here is one we prepared earlier!
- Include your Z-Wave Dimming module into your Z-Wave Gateway. Again, pay attention to how the Z-Wave Dimming module is placed into inclusion mode. All devices have slightly different methods of setting them into inclusion mode, so once again please refer to the user manual included with the device.
- Automate your lights! Once your Z-Wave module has been successfully installed and included into your Z-Wave network, you can control it from the wall or your devices and you can create scenes. Scenes will allow you to have your lights dim up or down at certain times of day, when a motion sensor detects motion, or even when lighting levels drop below a certain level.
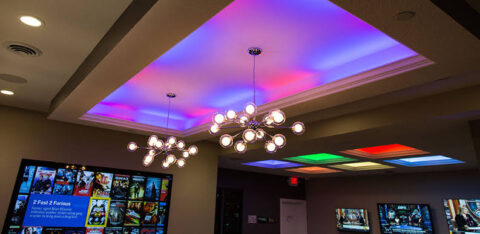
Changing colours of your RGBW LED Lights
What will you need:
- A Z-Wave RGBW Module
- Mechanical Pushbutton Light Switch such as the Clipsal 30PBBP or 60PBBP
- Suitable RGBW LED Strip Lights
- A Z-Wave Gateway such as the Vera Plus
How to get this in your Home:
- Most RGBW LED Lighting Strips are low powered devices, meaning they can run off 12V DC power. Control can be from a wall switch, or as all others via your devices. In order to obtain best results we recommend first changing the switches on your wall to a Mechanical Pushbutton.
- Wire up your Z-Wave RGBW module as instructed in the user manual. This will once again likely be provided by the manufacturer.
- Include your Z-Wave Dimming module into your Z-Wave Gateway. Again, pay attention to how the Z-Wave RGBW module is placed into inclusion mode. All devices have slightly different methods of setting them into inclusion mode, so once again please refer to the user manual included with the device.
- Automate your lights! Once your Z-Wave module has been successfully installed and included into your Z-Wave network, you can control it from the wall or your devices and you can create scenes. Scenes will allow you to have your lights change colour to suit the mood, temperature or even bring out features and designs in your home.
Automation Ideas and Options
Automation is essentially a process of figuring out some kind of trigger and having your lights respond to that trigger in a way that you want them to. This means that your imagination is probably the main factor which impacts how you ultimately set up your smart home! Here are some ideas of Scenes which we see most commonly implemented.
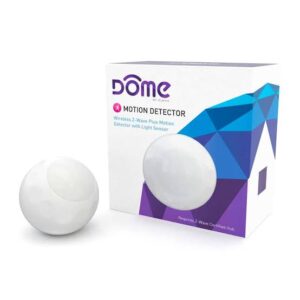
Using a Multi Sensor
Sensors, like the Dome Multi Sensor, are a great way to begin automating your lights. Multi-sensors generally have a number of different sensing abilities such as motion and luminosity. Placing multi-sensors in strategic places can really enhance your experience and allow for your home to truly be smart. A sensor in the hallway can be the trigger in a Scene where the lights switch on at 50% dimming when it detects motion at night. This allows for a fantastic alternative to a night light and stops you fumbling around for the light switch! No more stubbed toes from walking into furniture in the dark!
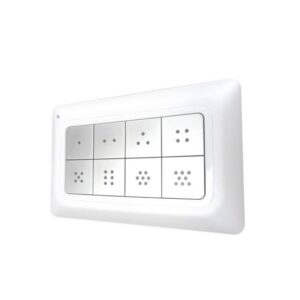
Using a Scene Controller
There is a group of devices called Scene Controllers who’s main task is to activate Scenes that you have created. The Remotec ZRC-90 can control up to 16 different Scenes from the one handheld remote. With the simple press of a button you can set your Entertainment area into Party mode, where certain lights are switched off, others are dimmed down and LED light strips are set to a different colour to the usual. You could also have another button that returns them all to “normal” and another which switches them all off!
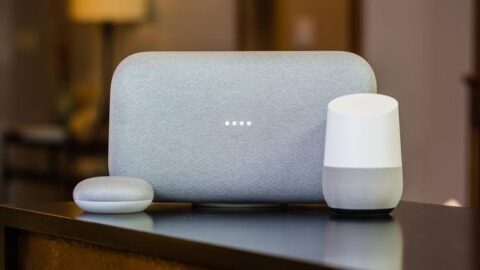
Using Voice Control such as Amazon Alexa or Google Home
Voice control devices have become extremely popular with almost every third home in the country having either a Google Home or Amazon Alexa. Vera Gateways allow for simple and easy native integration so that you can use them to add another level of control to your Z-Wave network. They can activate devices like switching on or dimming lights, and can also activate Scenes. A great idea is to have a Scene called “Goodnight” where it can switch off all your internal lights and also integrate with your Smart Lock to lock the front door, and Smart Blinds to shut automatically!